Gmail signatures are like your business cards, giving your emails a professional look. But adding a signature manually every time is a tedious task. So here is how to conveniently add a signature in Gmail to make you stand out through your every email.
In the present era of digital communication, there is a lot of noise and distraction. There are many communication avenues taking over, along with shorter attention spans. So in order to leave your mark and reach the audience directly, you need to take the perfect route. Here the role of emails come into play where they have become an integral part of your daily routine. Every day you might be sending tons of emails to people for various business and personal purposes.
But then the important question is how to increase the effectiveness of your emails? The answer is simple, add an email signature and turn the tables in your favour. An email signature gives you an opportunity to add a brand tag to every message you send. It leaves a lasting impression on the minds of the recipients, convincing them to extend their relationships with you.
So to make things more convenient for you and to perfect the Gmail signature setting, we have compiled this guide. It will direct you through the professional way and save you from the hassles of adding a signature every time you are ready to send your emails.
Importance of email signatures
Closing all your emails with signatures is a necessity rather than an option. As per The State of Business Email Marketing report, 82 percent of marketers make use of email signatures to enhance brand awareness and reputation. An email signature can be customized as per your requirements and fulfil purposes such as depicting professional courtesy, building brand awareness and generating leads and traffic.
Creating signatures in Gmail is simple, and the perks it offers are plentiful. So let’s delve into the process so that you can make the most of these important email armours and strike all the right chords.
How to add Gmail signatures from desktop
According to Finances Online, Gmail is the most popular email platform, with more than 1.8 billion users all over the globe. Moreover, Techjury states that 60% of mid-sized companies in the US opt for Gmail rather than a dedicated domain for their emailing needs. So let’s look at how to add a signature in Gmail from the desktop. If you use this route for your email connections, then this guide will prove to be your perfect companion.
Step 1: Log into Gmail by opening a new tab in your web browser and proceed towards the Gmail website.
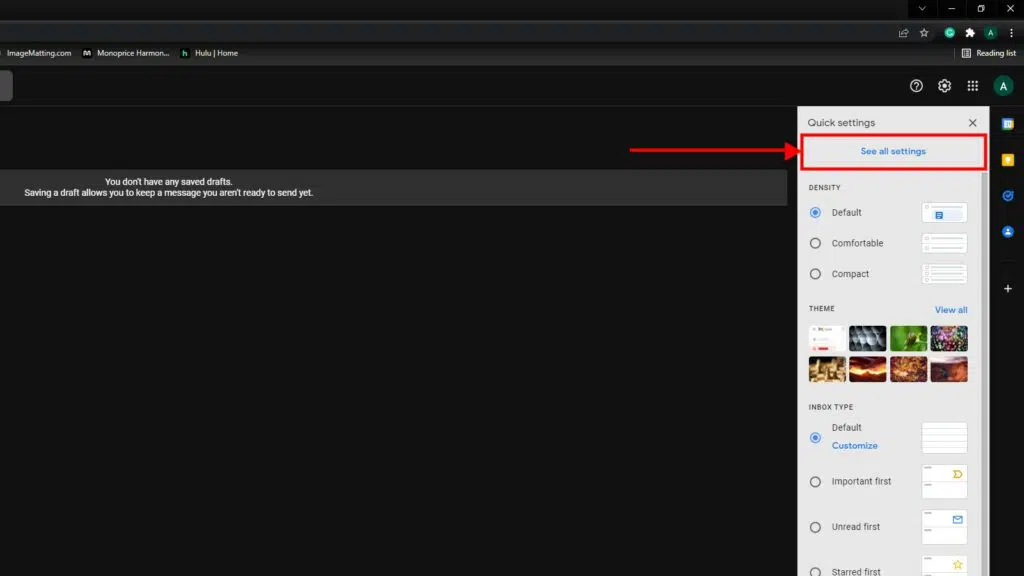
Step 2: Click on the settings button at the far right of Gmail.
Step 3: Once you do, you will be able to see a menu. Click on See all settings.

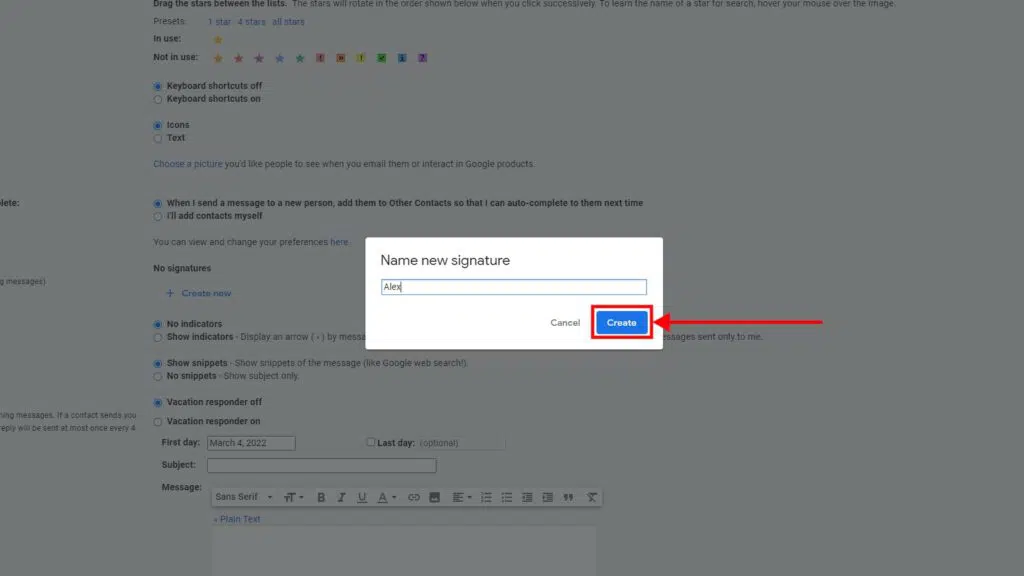
Step 4: Once you open the settings sections, there is a signature option. Click on the create new tab. You can now set a name for your signature. This is not the text, it is just the identity that your signature will have.
Step 5: After naming your signature, you will get a box where you can add your content. If you want, you can format your text by adding images and changing the styles. Once your signature has been added, you can choose to make it a part of your new emails only, or you can add it to your replies and forward messages too. This can be done from the signature default section just below the create new tab.
Step 6: Once the signature is set and you have finished with the process, click on save changes at the bottom, and you are ready to flaunt your emails with the perfect signature of your choice.
Isn’t the process of adding a signature simple? This method can also be used to add more signatures in the future. Like if you want, you can add different signatures in Gmail for new emails and replies.
Also, if you want to switch between the Gmail signatures, you can easily do so while composing your email. Just click on the insert signature button and choose the one according to your preference. Gmail will handle the rest for you.
Also read: How to Enable YouTube Dark Mode on Computer & Android App
How to add Gmail signature in mobile
According to litmus, by June 2021, 46% of emails were opened on mobile phones. So the need of adding a signature through your most important device cannot be overlooked. But we are here to save the day and guide you through the process of adding uniqueness to your emails in case you use the Gmail app on your android or IOS.
Step 1: On the mobile device, open the Gmail app.
Step 2: There is a menu on the top left side. Select it.
Step 3: Scroll down. Select settings at the bottom
Step 4: Choose the email account for which you want to add the Gmail signature.
Step 5: Once you do so, scroll down to the general section and tap the Mobile Signature option. Add the text to make it your signature. Please note that in the case of the mobile app, you can only add one signature for a single account. Once you have finished adding the Gmail signature, tap ok, and you are ready to add that professional touch to the emails sent from your account.
The signature adding option in the Gmail app on your mobile device has limitations in terms of formatting too. Plus, unlike the desktop route, you cannot add multiple signatures, and you cannot also select the email types. The signature you add will be part of every email you send. But yes, in case you don’t want the details to be added in any specific email, you always have the option to remove them manually from the bottom of that particular email.
Represent yourself through powerful email signatures
Professionalism does not just come from your attire and team management skills, you need to depict it through your communication channels too. And Gmail signatures are just the right tool for this. They are a trustworthy mode that highlight your identity and make you stand out.
So use our guide and add perfectly designed email signatures in Gmail that land you directly in the minds of your recipients, serving the purpose of making a long-lasting impression on them. You need to leave a mark on your audience, and your signature in Gmail is the right armour that will help you conquer the game in no time.


